
 Get started
How to add a wishlist to Shopify (no customer login needed)
Most visitors aren’t ready to buy on their first visit. A wishlist lets them save what they liked and come back to it. Here’s how to add one without making shoppers create an account, and what to know about where the list is stored.
Most people who visit an online store aren’t ready to buy yet. They’re comparing, waiting for payday, or looking for a gift. Without a way to save what they liked, they have to find it again later, and many don’t bother.
Shopify has no built-in wishlist. This guide shows how to add one with Seny: a heart on every product, a list shoppers can open from any page, and one-click Add to cart from that list, with no account or login needed.
When a wishlist helps
- Stores with many products, where shoppers browse and compare before deciding.
- Higher-priced products, which people rarely buy on the first visit.
- Gifts and seasonal shopping, when shoppers collect ideas first.
For a store with a few low-priced products, a wishlist adds little: the shopper can simply add to cart.
Step 1: Open the Wishlist in Seny
In Seny, open Apps library and choose Wishlist under “Build loyalty and shopper confidence”. It opens with everything switched on: a heart on product images, a heart button on product pages and a floating wishlist button in the corner.
Step 2: Choose where the hearts appear
There are two kinds of heart, each with its own settings:
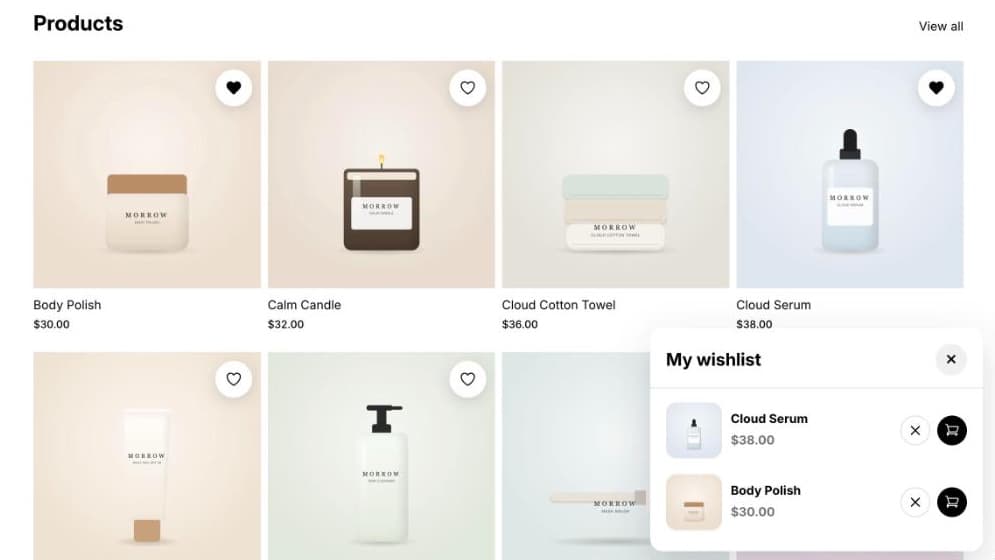
- Product image button: a heart in the corner of each product image in collections, search and product grids. Position sets the corner. Move it if your theme already puts a button there, such as quick add.
- Wishlist button: a heart on the product page itself, by default below the Add to cart button, as an icon or with text such as “Add to wishlist”.
Step 3: Set up the wishlist drawer
The floating Launcher shows how many products are saved and opens the My wishlist drawer. Each saved product shows its current price, a remove button and an Add to cart button. You can change the heading, the empty-list text, and the button texts such as “Sold out”, which appears when a saved product runs out of stock.
Step 4: Publish and test it
Click Publish. On your store, save a few products, go to another page and open the list: the count and the products should still be there. Try it on a phone too, where the corner button must not cover your cart or chat.
Where the wishlist is stored
The list is saved in the shopper’s own browser, so it works without an account and without asking for an email. That also sets its limits:
- It stays on one device. A product saved on a phone doesn’t appear on the shopper’s laptop.
- Clearing browser data clears the list. So does a private browsing window when it closes.
- You don’t see the lists. The saved products never leave the shopper’s browser, so there is no report of what people saved and no wishlist reminder emails.
For most stores that’s a fair trade: no sign-up wall and no personal data collected, in exchange for no cross-device sync. Up to 50 products can be saved.
Common mistakes
- Hearts that cover theme buttons. Check the image corner against your theme’s quick add or sale badges.
- Too many floating buttons. A wishlist launcher, a chat bubble and a cookie banner in one corner crowd the screen on a phone.
- Expecting reminder emails. A browser-saved list can’t email anyone. Use your email tool for abandoned cart and back-in-stock messages.
- Hiding the product-page heart. Shoppers often decide to save a product on its page, not in the grid.